IVY HILL FARM
Big Prairie, Ohio
The basic chip can be combined to make all sorts of interesting patterns.
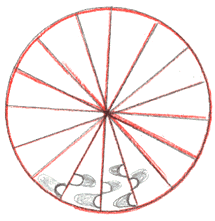
It is no more difficult to carve circular patterns than band patterns. Just make the appropriate guide lines, and follow them. The guide line
circle can be drawn on the gourd surface using a compass. Put several pieces
of masking tape on the gourd where you want to plce the point of the compass
so that it does not make a hole in the surface of the gourd. A compass
works better than trying to draw around a pattern because the surface of
the gourd is not usually flat, and patterns wrinkle. The next step is to
draw a horizontal
 and a vertical line through the center of the circle. Continue dividing
the circle into wedges until you end up with a size on the diameter of
the circle that allows chips of the largest size you want to carve. Start
carving the chips facing one direction around the outside of the circle.
Then reverse the direction on the next round, taking care to interlock
the stop-cuts. Continue working into the center, skipping a chip or two
if they begin to get crowded. If you are carving an extermely large circle,
draw guide lines for a few inner circles with the same center, just to
be sure you are working evenly.
Variations on this pattern include leaving a few uncarved rows which
makes a pretty contrasting smooth area inside the circles. On a very round
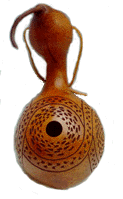
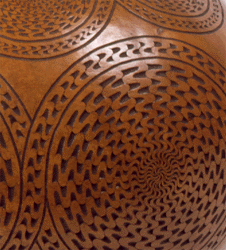
gourd, you can place four circles with the bands which weave under each
other as shown on the gourd above (and the detail below). Experiment with
different size U-gouges -- the same pattern takes on a very different look.
 The outlines
of the bands are really harder to carve than the chips, since it takes
a long extended push of the gouge to carve a "line". Starting
and stopping leaves uneven places until the carver develops a steady hand.
It just takes practice, and remember that carving always looks more uneven
before it is stained because on an unstained gourd, the differences in
carving depth tend to cast shadows on the lighter surface. That all smoothes
out with staining -- and it looks even better when you apply a coat of
paste shoe polish over the stained finish because the glow of the buffed
shoe polish draws the eye to the background.
A further note on the topic of staining is a reminder that it is possible
to carve some areas of a gourd, stain them, and then then carve additional
areas of the gourd to reveal the lighter surface, producing three different
colored areas: the dark carving (done first), the medium brown background
of the uncut surface, and the light carving (done after staining). Once
the gourd has been stained, it is difficult to remove pencil markings,
so any carving done after staining is best done free hand unless the guidelines
are carved away. (Back to previous page.) (More
about chip carving.)
Ivy Hill Farm, (John and Marilyn Rehm),
5725 CR 51, Big Prairie, OH 44611, (330) 674-7890
Ivy
Hill Homepage | Gourd Birdhouses | Gourd Carving
| Exhibits
& Classes | e-mail
 and a vertical line through the center of the circle. Continue dividing
the circle into wedges until you end up with a size on the diameter of
the circle that allows chips of the largest size you want to carve. Start
carving the chips facing one direction around the outside of the circle.
Then reverse the direction on the next round, taking care to interlock
the stop-cuts. Continue working into the center, skipping a chip or two
if they begin to get crowded. If you are carving an extermely large circle,
draw guide lines for a few inner circles with the same center, just to
be sure you are working evenly.
 The outlines
of the bands are really harder to carve than the chips, since it takes
a long extended push of the gouge to carve a "line". Starting
and stopping leaves uneven places until the carver develops a steady hand.
It just takes practice, and remember that carving always looks more uneven
before it is stained because on an unstained gourd, the differences in
carving depth tend to cast shadows on the lighter surface. That all smoothes
out with staining -- and it looks even better when you apply a coat of
paste shoe polish over the stained finish because the glow of the buffed
shoe polish draws the eye to the background.