IVY HILL FARM
Big Prairie, Ohio
Chip carving on gourds is done with a U-shaped wood gouge. The "chip"
is removed from the surface of the gourd by making a 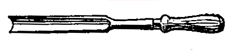 U-shaped
stop-cut (by placing the gouge at a right angle to the surface of the gourd),
moving the gouge backwards a short distance from the stop-cut, and then
using a gentle rocking motion to move the gouge (at about a 45° angle)
toward the stop cut while slightly increasing the downward pressure. When
the gouge reaches the stop-cut, a chip (indicated below by the grey area)
pops out of the surface of the gourd. Although the chip is nothing spectacular,
it is possible to produce intricate carved designs by aligning the pattern
of chips. In general, a line of carving is made where all the stop-cuts
face the same direction as shown in the sketch below.
U-shaped
stop-cut (by placing the gouge at a right angle to the surface of the gourd),
moving the gouge backwards a short distance from the stop-cut, and then
using a gentle rocking motion to move the gouge (at about a 45° angle)
toward the stop cut while slightly increasing the downward pressure. When
the gouge reaches the stop-cut, a chip (indicated below by the grey area)
pops out of the surface of the gourd. Although the chip is nothing spectacular,
it is possible to produce intricate carved designs by aligning the pattern
of chips. In general, a line of carving is made where all the stop-cuts
face the same direction as shown in the sketch below. 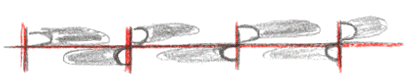 The
gourd is then turned so that the carving is done in the opposite direction.
The red lines indicate pattern layout lines which can be erased from the
surface of the gourd. Note that when the carving changes direction, the
stop-cuts of the two rows touch at the tip of the U. This is called interlocking
the stop-cuts and it is the "secret" of clean chip carving
designs. As the gourd is carved, the chipping reveals the lighter more
porous areas of the gourd below the outer surface. Because there is not
much contrast, it takes an application of stain (any wood stain or leather
dye) to really reveal the pattern. The stain soaks into the cut out areas
faster, turning them a darker brown, making even the thin stop-cuts stand
out.
The
gourd is then turned so that the carving is done in the opposite direction.
The red lines indicate pattern layout lines which can be erased from the
surface of the gourd. Note that when the carving changes direction, the
stop-cuts of the two rows touch at the tip of the U. This is called interlocking
the stop-cuts and it is the "secret" of clean chip carving
designs. As the gourd is carved, the chipping reveals the lighter more
porous areas of the gourd below the outer surface. Because there is not
much contrast, it takes an application of stain (any wood stain or leather
dye) to really reveal the pattern. The stain soaks into the cut out areas
faster, turning them a darker brown, making even the thin stop-cuts stand
out.
The information presented so far is all that is necessary to carve the
pattern of gentle S-shaped curves on the birdhouse 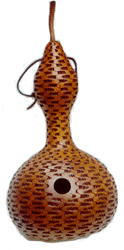 shown
at the right. To lay out the design, a line is drawn around the widest
part of the gourd (corresponding to the horizontal red line in the pattern
above. Then vertical lines are drawn at equal intervals around the gourd
to indicate how long each chip is be carved above the horizontal line.
The first line of chips is then carved above the horizontal guide line.
(If the gourd is to be a bird house, it is easier to make the entrance
hole before carving.). The second line of chips is carved below the horizontal
guide line, taking care to interlock the stop cuts. Succeeding rows are
carved by reversing directions and interlocking stop cuts until the desired
amount of gourd surface is carved. If the gourd narrows, the length of
the chips will shorten, and if the gourd flairs out again, the chips will
lengthen again as shown in the bird house. If desired, a chip can be omitted
from time to time to keep the carving looking more even. As the carving
progresses to the bottom of the gourd, it turns automatically into a circular
pattern around the center of the bottom. Again, if the gourd is uneven,
it may be necessary to improvise a little to even out the carving, and
definitely some chips will have to be skipped toward the center of the
bottom. An excellent beginning project in carving is to make a band of
carving around the middle of a gourd bird house. A band pattern eliminates
carving the more difficult areas of the gourd (neck, top, and bottom) and
sets the carving off with contrasting areas of smooth gourd surface. (More
about chip carving.)
shown
at the right. To lay out the design, a line is drawn around the widest
part of the gourd (corresponding to the horizontal red line in the pattern
above. Then vertical lines are drawn at equal intervals around the gourd
to indicate how long each chip is be carved above the horizontal line.
The first line of chips is then carved above the horizontal guide line.
(If the gourd is to be a bird house, it is easier to make the entrance
hole before carving.). The second line of chips is carved below the horizontal
guide line, taking care to interlock the stop cuts. Succeeding rows are
carved by reversing directions and interlocking stop cuts until the desired
amount of gourd surface is carved. If the gourd narrows, the length of
the chips will shorten, and if the gourd flairs out again, the chips will
lengthen again as shown in the bird house. If desired, a chip can be omitted
from time to time to keep the carving looking more even. As the carving
progresses to the bottom of the gourd, it turns automatically into a circular
pattern around the center of the bottom. Again, if the gourd is uneven,
it may be necessary to improvise a little to even out the carving, and
definitely some chips will have to be skipped toward the center of the
bottom. An excellent beginning project in carving is to make a band of
carving around the middle of a gourd bird house. A band pattern eliminates
carving the more difficult areas of the gourd (neck, top, and bottom) and
sets the carving off with contrasting areas of smooth gourd surface. (More
about chip carving.)
Ivy Hill Farm, (John and Marilyn Rehm),
5725 CR 51, Big Prairie, OH 44611, (330) 674-7890
Ivy
Hill Homepage | Gourd Birdhouses | Gourd Carving
| Exhibits
& Classes | e-mail